A pen mark becomes a larger laundry problem when it travels unnoticed into a pocket or a mixed wash. Before trying to dissolve the colour, isolate the item and find the pen. Some inks resist removal, and a treatment that spreads them can enlarge the affected area. The first useful result is containment; stain removal follows only when the fabric and product instructions support it.
Stop the pocket from joining the wash
Remove the garment from the laundry basket and empty every pocket over a protected surface. Look for a broken cartridge, uncapped pen or felt tip. Handle leaked ink without squeezing the barrel. Keep the pen for identification in a secure bag away from children, rather than leaving it on the washer lid.
Check nearby garments and the basket lining for transferred marks. If the garment has already entered the washer, inspect the drum and visible seals using the appliance manual's cleaning advice. Do not run a clean load through a visibly ink-marked machine and hope the next wash removes the deposit harmlessly.
This article concerns an ink mark found before routine laundering. A ruptured pen in a dryer or a large solvent spill is a different appliance-cleaning problem. Do not apply flammable cleaning liquid inside an appliance. Get model-specific manufacturer guidance when ink has reached machine surfaces.
Identify the ink without trusting colour alone
Record the pen brand and type where known: ballpoint, gel, felt tip or permanent marker. A blue line does not establish that an ink is water-soluble. Product information from the pen or stain-remover maker may narrow the appropriate route. If the pen is missing, say the type is unknown.
Photograph the mark, its reverse and any transfer to a lining. Check how far it has travelled through the garment. A short line across a single plain layer presents a different handling problem from a saturated pocket with interfacing and several seams.
The ACI toolkit notes that some pen inks may be impossible to remove. Set expectations accordingly, especially for a valued garment. An honest professional assessment can be more useful than repeated experiments intended to guarantee restoration. Keep the item unheated while deciding; neither ironing nor tumble drying is a diagnostic step.
Read the garment as a constructed object
Locate the care label and read washing, bleaching, drying and professional-care instructions together. FTC guidance concerns the complete garment, including components. The washable cotton content of a pocket bag does not establish that a lined jacket can tolerate the same treatment throughout.
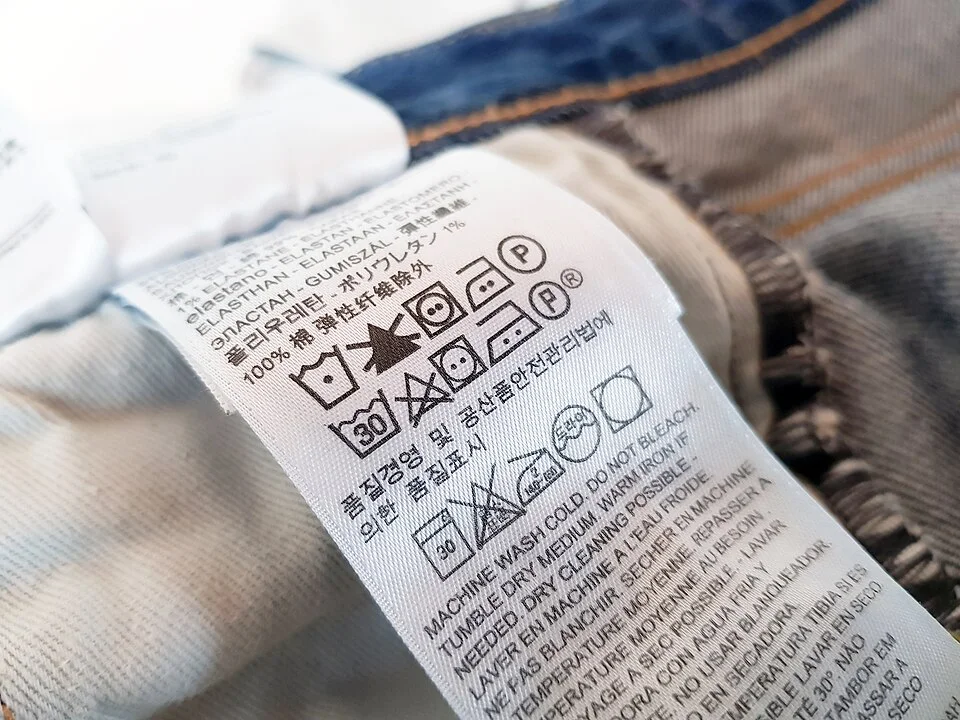
The label combines several symbol rows with written directions, illustrating why the whole garment’s care information belongs in the decision. Check washing, bleaching, drying and professional-care restrictions together before selecting an ink treatment. These printed instructions belong to the photographed garment; they do not authorise the same temperature, product or method on a different fabric, lining or trim.
Photo & usage
Roland Russwurm · CC BY-SA 4.0 · Source. Display copies resized and encoded as WebP; no instructional details were fabricated or removed.
Check for bonded panels, delicate prints, coated fabric and contrasting trim near the mark. If the label requires professional care, keep the garment out of this home-wash workflow and explain the ink history to the cleaner. Ask the manufacturer about unclear or missing instructions rather than treating a hidden lining as a substitute label.
Do not infer that a “do not bleach” instruction refers only to chlorine. In the GINETEX system, the crossed triangle prohibits bleaching. Read the whole proposed product formulation and its exclusions. Ink can be difficult, but that difficulty does not remove the garment's material limits.
Choose a labelled method or make a handover
For a compatible washable garment, find a product with explicit ink-treatment directions appropriate to the material. Read the full instructions before applying any liquid. Check required ventilation, handling, contact time, backing material and rinsing. Keep the original packaging so you can record exactly what was used.
Test an inconspicuous area as directed. Look for colour transfer and surface changes after the required observation stage. A successful colourfastness test does not guarantee ink removal; it only addresses one compatibility question. If the fabric response is uncertain, stop before treating the visible mark.
Avoid borrowing alcohol, acetone or another solvent recommendation without product and fabric confirmation. These can be unsuitable for some materials and create additional handling requirements. A professional handover is a practical choice where the method exceeds your instructions, equipment or confidence. Describe the untreated ink and any previous attempts accurately.
Read an illustrative containment comparison
These observations are invented and illustrative, not results of testing pens or stain products. They show how similar-looking marks can lead to different choices before any washing begins. The useful comparison is the combination of pen identity, garment construction and treatment permission.
| Finding | Available information | Next step |
|---|---|---|
| Short line on plain washable shirt | Known pen; compatible labelled product | Hidden test, then directed treatment |
| Saturated lined jacket pocket | Professional-care label | Cleaner handover with pen details |
| Blue halo on coated garment | Unknown pen; unclear care | Hold and contact manufacturer |
The first garment is a candidate for home treatment, not a promised success. The second has a clearly different care route. The third needs information before action. A household note that says “ink: do not wash yet” prevents a well-intentioned helper from combining all three in an ordinary dark load.
Give the untreated item a clear holding place
Put an unresolved ink garment where it cannot accidentally rejoin the wash. Use a clean dry container and a plain written note naming the item, mark and pending question. Do not seal a wet or solvent-treated garment into a household bag; follow the treatment product’s handling directions.
If a cleaner will receive the item, prepare the pen details and photographs before transport. Explain whether ink is still wet, whether it transferred to another layer and which products have touched it. Do not pack it against a clean garment that could receive a fresh mark. The containment task continues during the handover, not only beside the washer. Keep leaking pen components in a secure separate container and follow their disposal guidance after any identification information has been recorded.
Verify the result before returning the garment
After the permitted treatment and complete appropriate drying, inspect the mark under consistent light. Check the reverse and nearby seams for a new halo. Feel for residue and compare the fabric surface with an unaffected area. Keep any unresolved garment out of routine ironing and heat drying.
If ink remains but the fabric is stable, consult the product's repeat limits or seek professional advice. If colour loss, brittleness or surface change appears, stop. Another treatment cannot be assumed to repair damage. Record the sequence and accept that some remaining marks may require a cosmetic compromise rather than further chemistry.
Before closing the job, remove the leaking pen from service, clean the protected work area and inspect the laundry basket again. The completed workflow leaves both the garment and the shared laundry route with a known status. Preventing a pen from entering the next load is a concrete success even when its original mark proves permanent.
THE REFERENCE FILE
Sources & scope
Documentation reviewed 1 Nov 2026. Examples are illustrative; this article does not claim hands-on product testing. Follow the instructions for your actual material, model and location.